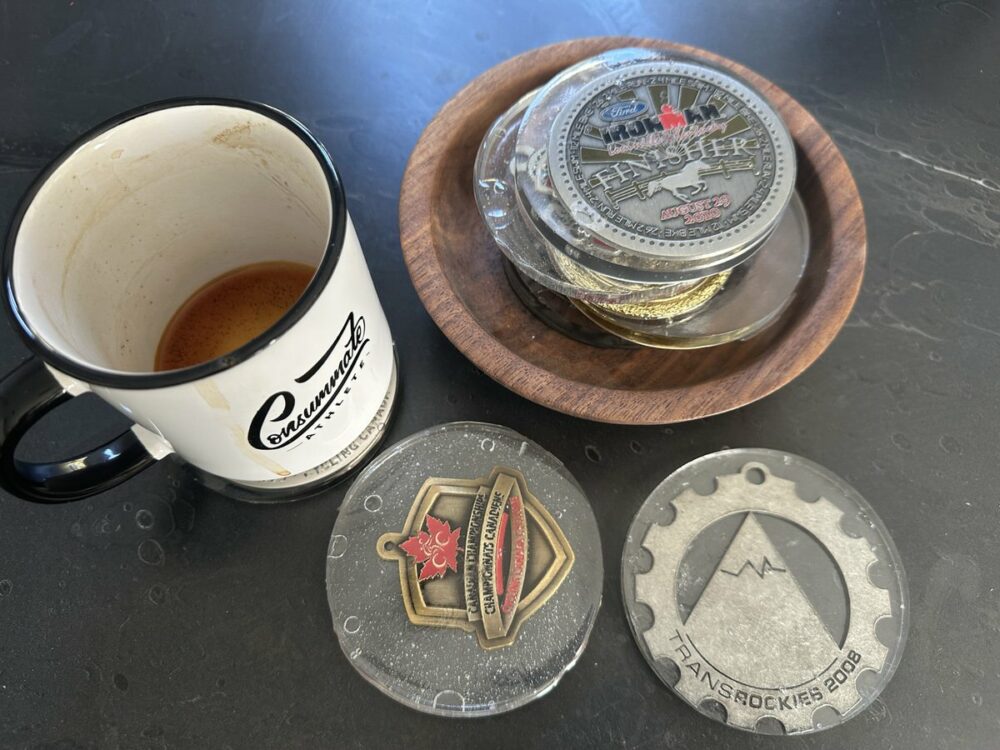
I’m always trying to figure out what to do with medals from races. I’ve hung them, we have a big jar of them, but we never really do much with them. I realized a couple of them were roughly coaster sized recently, and that got me thinking. How could I make our medals into actual coasters? I was at a tacky souvenir shop at Virginia Beach last summer when it hit me: Resin. It’s all over at souvenir shops, making coasters, paperweights and other cheesy shell-themed tchotchkes. I realized it would be a great medium for those race medals! It’s a nice way to bring those medals out of storage and into everyday life in a really useful way—and give whoever got the medal a new chance to casually bring up that Ironman during a dinner party…
It’s super easy to do, as well! It’s a bit time-consuming, but not in the actual doing part, more in the waiting. So having a tabletop that can be used for 24 hours as your resin HQ is important! Best part? It’s also surprisingly cheap. You can get the resin for under $30, and molds for under $10—and you can reuse the molds over and over, or lend them to a friend.

What you need:
Resin + Hardener
You can opt for cheaper and just get the resin and hardener, but if you don’t have a lot of craft supplies lying around, this might be the easiest kit option. That’s what I did, but I probably would now just get the hardener, since I can use old yogurt tubs for mixing and I have random stirring utensils that I can use, like old pens. We also have a box of latex gloves in the van for bike maintenance on the go, since no one wants oily/greasy hands pre-race. But if you prefer the all in one ready to go option, a kit is great.
Silicone Coaster Molds
I don’t suggest going with the cheapest option on Amazon, which is what I did. If I did it again, I would have gotten these slightly deeper molds, since the bigger medals were nearly as tall as the molds that I did get. I like the ability to choose your depth a bit more, plus I like that this is a tray so there won’t be any spills. (I have a couple of spots on my desk now!)
And your pile of old race medals
Cut off the ribbons and pull off any extra metal bits, obviously.

Ready for a dinner party humblebrag
How to make your race medal coasters
I won’t give you a full step by step instruction, since you’ll just follow the directions on the resin bottles, but basically:
- Put down newspaper on the surface you’re using. You DO NOT want resin getting on any surface other than your molds. And definitely do this wearing gloves.
- Mix your resin and hardener in an exact 1:1 ratio (should be about 1/2 cup of each for the molds above)
- MIX SUPER SUPER WELL. They say mix for 3-5 minutes, and definitely go for the full 5 minutes. Set a timer if you have to. I messed up on this when I was going too fast on one batch and ended up with a couple spots that would not dry
- Fill your molds a bit less than half-way. You can use a needle to prick any air bubbles if you want it to be perfectly smooth, though personally, I actually like the bubbles! Let this sit for 30-45 min to slightly harden, especially if you want your medal to be ‘floating’ in the middle of the coaster and you don’t want it to slide off to the side.
- Place your medal into the resin once it’s slightly tacky
- Mix up your second batch of resin/hardener—again, DO NOT SHORTCUT THIS.
- Pour that resin mixture over your medal
- Leave for 24 hours before you try to take them out of the mold—don’t rush it!
If you want to speed through it, you can do it all at once—resin, medal, resin. That’s what I did and it mostly turned out well, but a couple of the medals are a bit off-kilter in the mold. They don’t look bad, but they could look better! I recommend trying the first batch on medals that don’t matter as much to you, just to test it out and make sure you like the effect.
PS—this is a great gift for your significant other if he/she races!


